In screen printing, achieving the perfect tension in the mesh is a critical step that directly influences the quality and precision of the final print. Stretching mesh for screen printing is both a science and an art, requiring meticulous attention to detail and a deep understanding of the characteristics of the mesh. This article delves into the essential considerations, techniques, and best practices for stretching mesh with a pneumatic screen stretcher.

Understanding Mesh Materials And Tension
Choosing the right mesh material is very important in screen printing because it affects how good the print looks and how long the mesh lasts. It’s best to use high-quality materials like polyester or other synthetic fibers because they are strong and last a long time.
Another important thing to consider is the mesh count, which is the number of threads in each inch of the mesh. If you want finer details in your print, go for a higher mesh count. But if you need more ink on the print, a lower mesh count is better. This way, you can meet different printing requirements.
Also, it’s really important to have the right tension in the mesh. This makes sure the ink is evenly spread and the printed image is clear and sharp.
What Is A Pneumatic Screen Stretcher?
A pneumatic screen stretcher is an advanced tool designed for screen printing, providing a more precise and efficient way to stretch mesh. Utilizing air pressure, it offers uniform tension across the screen, a crucial factor for achieving high-quality prints.
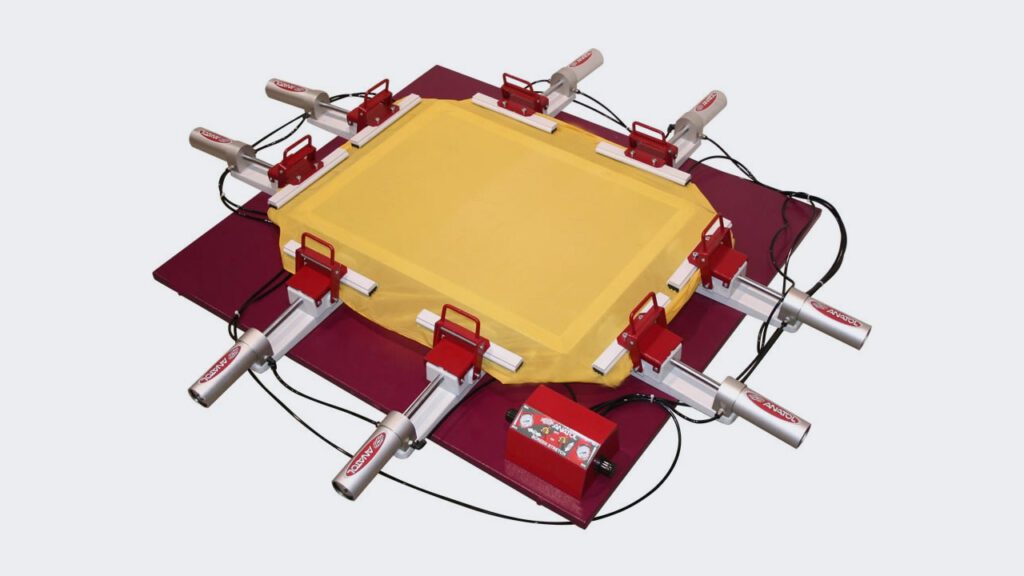
How A Pneumatic Screen Stretcher Works
A pneumatic screen stretcher is a tool that makes it easy to get the right tension in the mesh used for screen printing.
First, you put the frame into the stretcher, which holds it tightly in place. Then, the stretcher uses air-powered clamps to keep the frame from moving.
Next, you attach a piece of mesh to the frame. The stretcher then gently stretches the mesh using air pressure, making sure it’s not too tight or uneven. You can adjust the tension during this process to get it just right.
Once the mesh is stretched enough, it’s secured to the frame with special clamps or glue. Any extra mesh is cut off to make it look neat. Sometimes, you might need to let the glue dry to make sure everything is firmly attached.
Finally, a tension check is done to make sure the mesh is stretched just right, ensuring the best quality print.
1. Frame Placement
The screen stretcher has a holding mechanism for the screen printing frame. The operator places the frame into the stretcher, ensuring it is securely held in place. The frame must have a clean surface to ensure the glue will adhere and hold the mesh.
2. Clamping
The stretcher uses pneumatic (air pressure) clamps to secure the frame in place. These clamps prevent any movement of the frame during the stretching process and are placed on all four sides of the frame.
3. Mesh Attachment
A piece of mesh, cut to size, is laid over the frame. The edges of the mesh are secured to the frame using clamps or other fastening mechanisms.
4. Initial Tensioning
The machine initiates the stretching process by applying an initial level of tension to the mesh. This is usually a pre-set amount to provide a foundation for the stretching process.
5. Pneumatic Stretching
The pneumatic screen stretcher employs air pressure to stretch the mesh evenly in both the warp and weft directions. The stretching is typically done gradually and uniformly to avoid over-tensioning or warping.
6. Adjustment and Monitoring
The machine may have controls that allow the operator to adjust the tension levels and monitor the stretching process. This ensures precise control over the tension in both directions.
7. Securing the Mesh
Once the desired tension is reached, the machine secures the mesh to the frame, often by activating a clamping or adhesive mechanism to fix the mesh in place.
8. Trimming Excess Mesh
Any excess mesh extending beyond the frame is trimmed using a cutting tool, ensuring a clean and neat finish.
9. Drying or Curing
Depending on the stretcher and adhesive used, there may be a drying or curing step to allow the adhesive to set, creating a strong bond between the mesh and the frame.
10. Final Tension Check
After the stretching process is complete, the tension in both warp and weft directions is typically checked using a tension meter to ensure it meets the desired specifications.

Conclusion
Understanding and utilizing a pneumatic screen stretcher effectively is essential for achieving high-quality screen printing results. This guide offers insights into the importance of mesh material, tension, and the role of a pneumatic stretcher in producing precise and consistent prints.

- Screen Printing: Choosing The Right Mesh Count
- Screen Printing: Comparing Aluminum vs Wood Frames
- Screen Printing: Understanding The Impact Of Mesh Counts
- Screen Printing: The Advantages Of Newman Roller Frames
- Screen Printing: Navigating The Spectrum Of Frame Sizes
- Quality vs Cost: Make Your Next Embroidery Machine A Wise Investment
- Top 5 Embroidery Machine Factors To Consider When Buying Equipment
- DTF Printing: How To Choose The Right Printer & Dryer
- DTF Printing: A Beginners Guide To Production Setup
- T-Shirt Dye Sublimation Printing With Rob Super